shippingWe‘re shipping as usual! The Canada Post strike only affects certain remote deliveries and PO Boxes. Details
shipping Holiday Shipping Details & Extended Holiday Returns
  • $235.40
  • Free 30-day Returns
  • Volume Discounts Available
    • $234.40 ea.
    • $233.40 ea.
    • $232.40 ea.
    Ships from China.
    Price alert
    Shop it at NeweggBusiness.

    Meet Your Seller

    KVM Switch 3 Monitors 2 Computers 8K@60Hz 4K@144Hz, HDMI + 2 Displayport Triple Monitor KVM Switch for 2 PC Share 3 Monitor, Audio Mic Port and 3 USB 3.0 Devices Support Extended and Copy Mode

    • 3 Monitor KVM Switch: This KVM Switches 2 DP+1 HDMI connects 2 desktops or laptops to share 3 monitors and 3 USB 3.0 ports & Audio & Microphone Output. You only need one set of keyboard and mouse to control all the monitors, and it supports expanding and copying displays.
    • Ultra HD 8K@60Hz: Support up to Ultra HD 8K@60Hz resolution. And if you need different resolutions, fear not, it supports 8K@30Hz, 4K@120Hz,4 K@60Hz, 3D, and 1080P as well.
    • 3 USB 3.0 & Audio & Microphone Output: with 3 integrated USB 3.0 ports which can recognize keyboard, mouse, printer and other USB devices. Supports ultra-fast USB 3.0 data transfer up to 5Gbps, backward compatible with USB 2.0/1.1 devices. KVM Also supports separate audio and microphone output.
    • Convenient Switching Modes and Wide Compatibility: You can switch computers using the buttons on the panel or the wired remote control (supplied). Easy switching without delay. Widely Compatible with Windows/Vista/XP/Mac OS/Linux and Unix operating systems.
    +
    +
    Overview
    Specs
    Reviews
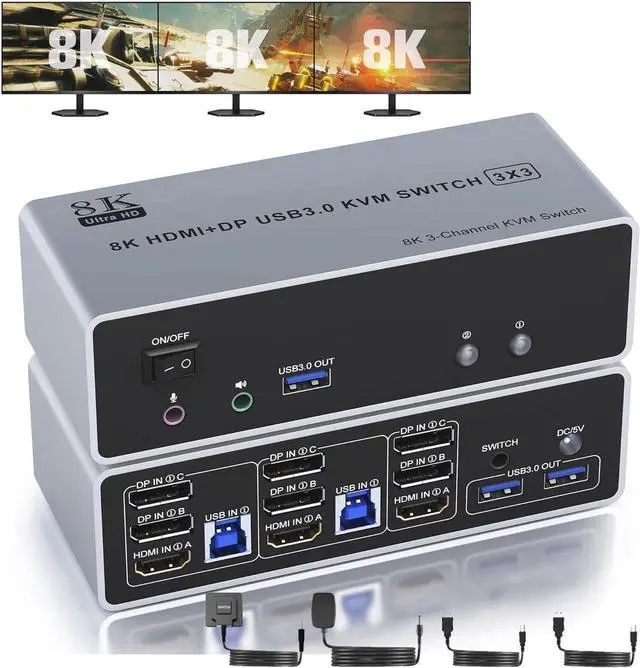
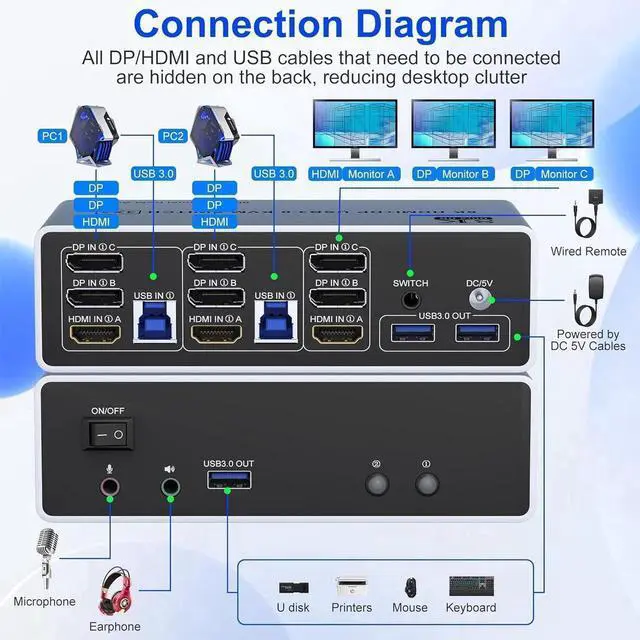
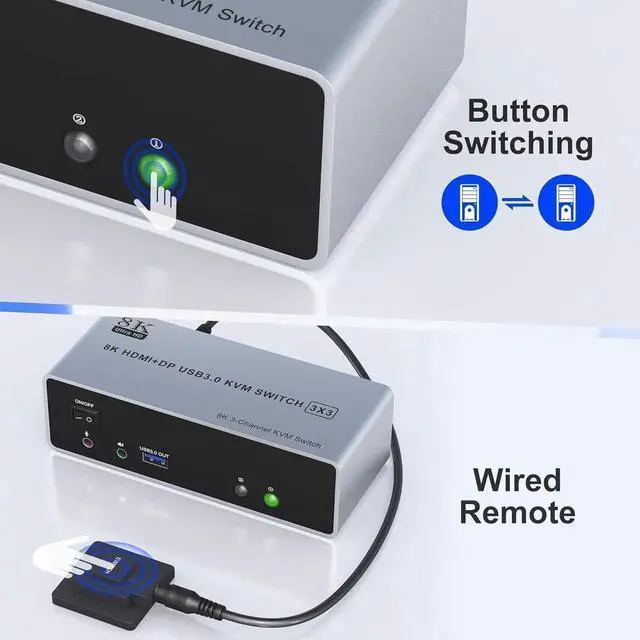
    1. Insert the adapter into the KVM;
    2. Plug the DP/HDMI cable into the KVM and monitor; (Output)
    3. 1). Connect PC1 Firstly (Input)
    Use 1 HDMI cable to connect the "HDMI IN 1 A" input interface and PC1 HDMI A output interface,
    Use 1 DP cable to connect the "DP IN1 B" input interface and PC1 DP B output interface.
    Use 1 DP cable to connect the "DP IN1 C" input interface and PC1 DP C output interface.
    Use 1 "USB-a to USB-b" USB 3.0 cable to connect the "USB IN 1" input interface and PC1 USB 3.0 interface.
    2)Then, Connect PC2 according to the connection steps of PC1.
    4. Insert the mouse and keyboard into the KVM switch
    5. If needed, you can connect a microphone and audio port

    Warranty & Returns

    Warranty, Returns, And Additional Information

    Warranty

    • Please contact the Seller directly for warranty information. Warranty information may also be found on the Manufacturer's website.
    • CONTACT

    Return Policies

    • Return for refund within: 30 days
    • Return for replacement within: 60 days
    • This item is covered by Goldendisk Return Policy

    Manufacturer Contact Info

    LOADING...