


- Free 30-day Returns
$378.99
Ships from Hong Kong.
Sold by Guhong Trade'Shop
Shipped by Guhong Trade'Shop

Meet Your Seller

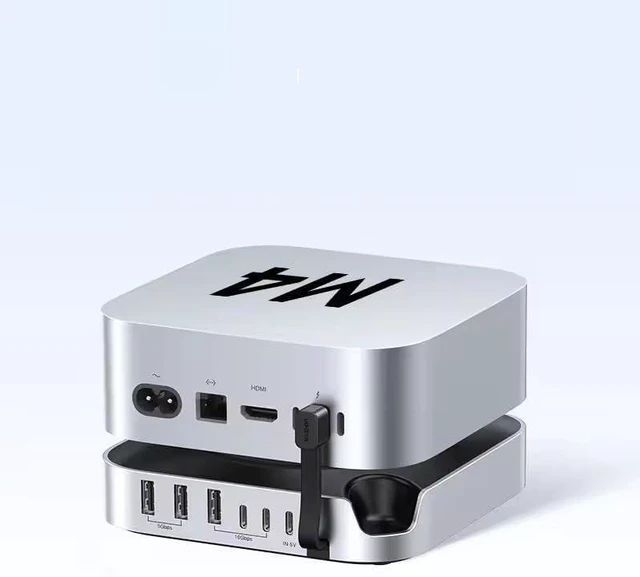

USB HUB Docking Station for Mac Mini M4 M4 Pro M.2 NVMe SSD 8TB Max 10Gbps USB-A&C Ports SD&TF 170MB/s Splitter Dock
- USB-Ax5 Type-Cx2 Easily Expand to Connect Various External Devices LikeKeyboards, Mice, USB Drives, and Portable Hard Drives SD/TF Dual Card Simultaneous Reading Supports Speeds ofUp to 104MB/s-Instantly Access andTransfer Photos and Video Footage. 15W Stable Power Port Connect to an External Power Source for Stable OperationEven at Full Load.
- Internal M.2 DriveExpand storage Quickly and Freely Compatible with M.2 NVMe SsDs,Supports 4 Different Specifications Supports 8TB LargeCapacity TheoreticalTransfer Rate: 10Gbps,Actual Continuous Read Speed Up to 900+MB/s Newly Upgraded10Gbps Transfer SpeedEquipped with 5 USB 3.2 Ports Easily Transfer Large Files
- Hard DriveInstallation Steps 1.Disconnect the product fromexternal devices,flip it upsidedown,loosen the screws,andremove the bottom panel. 2.Loosen the M.2 SSD screw. 3.Insert the M.2 SSDinto the M.2 slot andtighten the screw. 4.Reattach the bottompanel and tighten the screws 5.Connect the productto your computer.lf the drive appears
+
+
Overview
Specs
Reviews
USB-Ax5 Type-Cx2 Easily Expand to Connect Various External Devices LikeKeyboards, Mice, USB Drives, and Portable Hard Drives SD/TF Dual Card Simultaneous Reading Supports Speeds ofUp to 104MB/s-Instantly Access andTransfer Photos and Video Footage. 15W Stable Power Port Connect to an External Power Source for Stable OperationEven at Full Load.
Internal M.2 DriveExpand storage Quickly and Freely Compatible with M.2 NVMe SsDs,Supports 4 Different Specifications Supports 8TB LargeCapacity TheoreticalTransfer Rate: 10Gbps,Actual Continuous Read Speed Up to 900+MB/s Newly Upgraded10Gbps Transfer SpeedEquipped with 5 USB 3.2 Ports Easily Transfer Large Files
Hard DriveInstallation Steps 1.Disconnect the product fromexternal devices,flip it upsidedown,loosen the screws,andremove the bottom panel. 2.Loosen the M.2 SSD screw. 3.Insert the M.2 SSDinto the M.2 slot andtighten the screw. 4.Reattach the bottompanel and tighten the screws 5.Connect the productto your computer.lf the drive appears onyour computer, theinstallation is successful.
Internal M.2 DriveExpand storage Quickly and Freely Compatible with M.2 NVMe SsDs,Supports 4 Different Specifications Supports 8TB LargeCapacity TheoreticalTransfer Rate: 10Gbps,Actual Continuous Read Speed Up to 900+MB/s Newly Upgraded10Gbps Transfer SpeedEquipped with 5 USB 3.2 Ports Easily Transfer Large Files
Hard DriveInstallation Steps 1.Disconnect the product fromexternal devices,flip it upsidedown,loosen the screws,andremove the bottom panel. 2.Loosen the M.2 SSD screw. 3.Insert the M.2 SSDinto the M.2 slot andtighten the screw. 4.Reattach the bottompanel and tighten the screws 5.Connect the productto your computer.lf the drive appears onyour computer, theinstallation is successful.
Warranty & Returns
Warranty, Returns, And Additional Information
Warranty
- Please contact the Seller directly for warranty information. Warranty information may also be found on the Manufacturer's website.
- CONTACT
Return Policies
- Return for refund within: 30 days
- Return for replacement within: 90 days
- This item is covered by Guhong Trade'Shop Return Policy
Manufacturer Contact Info
- For a directory of all our manufacturers, please click below.
- Manufacturers Directory
LOADING...