Your Browsing History

BRANNAN B.
Joined on 10/17/02
0
0
product reviews
- 4
F4 BIOS NOT COMPATIBLE WITH RADEON HD R7950
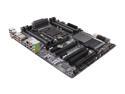
GIGABYTE GA-X79-UP4 LGA 2011 Intel X79 USB 3.0 ATX Intel Motherboard
Pros: Great board for the price! Great onboard components! Hackint0sh compatible! Although, I had many problems with this board; 1. There really isn't a better one for the price, and 2. Gigabyte's support is awesome! They always answer the phone, and call you back to follow up. I think the longest hold time I had was about 10 min. Those two facts alone are why I gave this product 4 stars, and will also keep me coming back to Gigabyte!
Cons: Like a previous reviewer stated, there are numerous BIOS issues. Some of which I wanted to shed some light on how to resolve. First off the F4 BIOS is NOT COMPATIBLE with a Radeon HD R7950 Graphics Card! You will get ZERO video output! Both the Final F2 and Beta F3t BIOS's are both compatible with the Radeon HD R7950. If you are using a 3.0 RADEON HD 7xxx Graphics Card, and your board ships with F2, DO NOT UPGRADE to F4! (F3t can only be obtained by calling Gigabyte Support). If your board ships with F4, you will have NO VIDEO OUTPUT, AT ALL! You will need to use a lower quality graphics card (I used a Radeon HD 3450) to get the system to boot. And here's the DOWNSIDE; you MUST downgrade the BIOS by using a CUSTOM version of atBIOS from Gigabyte Support, FROM WINDOWS. This is because F4 is a LOCKED BIOS, and can not be downgraded without specially modified atBIOS Utility! Q-Flash WILL NOT WORK. This means you will have to use a lower-end graphics card to install Windows FIRST! This has been a very time consuming project which has left me with a serious migraine! Hopefully my experience will help someone else! Read my Other thoughts on the BIOS Freeze issues.
Overall Review: How to get around the BIOS Freeze Issue (this is modified from another reviewer): This issue seems to only be related to the F4 BIOS, but others may have the same issue. Upon booting up, the motherboard would freeze at the BLUE UEFI BIOS Screen, right after the initial Post. You would get a Flashing Cursor, then a Mouse Cursor (you can move), and then it would lock up at the Blue UEFI BIOS Screen (Mouse & Keyboard stop responding). I tried several of the suggestions by another reviewer below, but nothing seemed to work...(solution at the bottom) "After much wasted time trying different things and researching I'm eventually able to get into the UEFI BIOS on one computer. I had to unplug everything but 1 DIMM, keyboard, mouse and move VGA to PCIe slot 2. Ok so the next time I try to enter the UEFI BIOS the system freezes again at initial bios screen. This time I discover that I have to unplug the mouse and it let me in the BIOS. 3rd time I try it the system locks up again. I try clearing the CMOS but not go. Then I move video card to PCIe slot 1 and it doesn't freeze. Oh and the mouse can be plugged in ??? VERY FRUSTRATING!! This is the story with both motherboards. They are extremely unreliable, flaky and unpredictable when it comes to trying to access UEFI BIOS. Once you finally get past the BIOS issue the system will load and run windows just fine. But if you every need to get into UEFI again. It's a huge frustrating ordeal of trial and error and to add insult to injury the Clear CMOS jumper doesn't work correctly. You have to pull the battery and wait about 5 minutes. But doing that doesn't really fix anything anyway." In addition to all the headache above, I also moved the single stick of memory to different slots (which didn't make any difference AT ALL). The one thing that DID WORK EVERY TIME, was to disconnect ALL of the SATA DRIVES! ALL = ALL (CD/DVD ROMs TOO)! This should allow you to get into the BIOS EVERY TIME! After which, you can configure it, reconnect your SATA Drives, and boot normally. Hopefully this saves someone's build from a crazy person with a Sledge Hammer. ;)
10/8/2013See more detail
Update to Previous Review
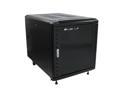
StarTech.com RK1236BKF Portable Server Rack Cabinet - 12U Server Rack - 36 in - with Glass Door - Network Cabinet - Rolling Server Rack with Casters
Pros: Although not as sleek as a Dell cabinet, these are great looking. Well made. Have good build materials. And a Lifetime warranty. The actual Rack Posts (4) are designed for use with the "universal" Cage Nuts and Screws (a bag of about 10-20 are included), which is very nice.
Cons: In addition to my previous comments, I would like to add the following: TEMPERATURE Even with only ONE Dell 2950 Server, and ONE UPS, the server reports an internal temperature of 115-125* F! As soon as the Front Door is open, or removed, the server returns to a normal operating temperature; about 77-79* F. StarTech's Customer/Technical Support told me they don't make any fans specifically for this unit, but said a lot of their customers (which means these temperature problems are wide-spread, and well known) have used their 12cm AC Fan Kit (ACFANKIT12) to cool the unit. The Rep told me that their customers attach them to the top vents somehow, even though there are no actual places to mount them. The best way I can see doing this is by; 1. Getting 2 Fans ($100-140) 2. Getting a Sheet of Acrylic to mount the Fans (and block the open portion of the vents) ($20-30) 3. Getting the nuts and bolts to secure the Fans to the Cabinet ($10-20) This adds $130-190 (in parts) to this cabinet, making it about a $630-700 (depending on shipping, $140 from StarTech). I'm not sure if this is make it worth it, seeming that you can get a Dell 2410 or 2420 for about that same price (search Google). I also asked the Rep if I could just replace the Front Door I had, with another Back Door. The Rep told me they don't have spare parts to sell me separately, and seemed unwilling to offer any other real solutions to their (obvious) engineering design flaws.
Overall Review: After everything, and after the lack of willingness of their Customer/Technical Support to help resolve the temperature issues, I'm not sure I can honestly recommend this product to anyone, nor will I EVER use it again.
10/9/2013See more detail
Thorough Review, Assembly Notes, & Dell Rapid Rail Kit Installation
StarTech.com RK1236BKF Portable Server Rack Cabinet - 12U Server Rack - 36 in - with Glass Door - Network Cabinet - Rolling Server Rack with Casters
Pros: Although not as sleek as a Dell cabinet, these are great looking. Well made. Have good build materials. And a Lifetime warranty. The actual Rack Posts (4) are designed for use with the "universal" Cage Nuts and Screws (a bag of about 10-20 are included), which is very nice. Setup is pretty simple for the technically inclined (takes about 2-3 hrs, if it's your first one). Most of it can be assembled without even looking at the instructions. You mainly need the instructions to determine which screws go where (which isn't extremely clear...there is no labeling on the screw bags themselves, or pictures of the screws the instructions reference to use)...but it really isn't that hard to figure out; you have the Cage Nuts & Screws, the included Allen and Torx-bit Driver, the Torx-head Screws (which are used for almost all of the build), Eight Alan Bolts with Washers (used for Attaching the Cross Braces to the Side Panels), and another bag of small screws which (for me) seemed to be duplicates of ones that were already partially installed for the Plastic Corner Caps. If you are not going to use a cordless torque-driver to assemble the case, and are going to assemble it by hand, I would recommend wearing padded leather gloves while screwing in the Torx-head Screws. The Torx-head Screws are somewhat "self tapping" (the holes they go in are not threaded, and are a bit smaller than the screws), thus it takes quite a bit of torque to get them in, and flush. The included Torx-bit Driver will tear up your hands while doing this if you do not wear gloves. You will also need to wear gloves, and use an adjustable wrench, when adjusting the Nuts on the Adjustable Feet prior to installation. I did not assemble my cabinet in the order the directions specified, but as follows: 1. REMOVE THE KEYS FROM THE INSIDE OF THE SIDE PANELS. 2. Attach the Casters. 3. Attach the Adjustable Feet. 4. Lock the Casters, and lean one Side Panel against a wall. 5. Attach the Bottom Cross Braces to the Side Panel leaning against the wall (blade/fin goes in). 6. Attach the other Side Panel to the Bottom Cross Braces (already connected to one Side Panel). 7. Attach the Top Cross Braces. 8. Attach the Top Panel. 9. Attach the Plastic Corner Caps to the top and bottom. 10. Attach the Bottom Panels (3). 11. Attach the Front and Back Panel Doors. 12. Done. Drink a beer. ;)
Cons: Torx-bit Driver: The included Torx-bit Driver is REALLY hard on your hands to use (leather padded gloves STRONGLY recommended). Foam Inserts in Wire Feed Slots: The Wire Feed Slots have a slitted foam insert to allow cabling to easily be passed in/out from the cabinet, while also keeping out as much dust as possible. This is nice in theory. However, the foam rips easily, and is easily destroyed, if not carefully feeding a cable (like a power-cord) through the slitted foam insert. It would have been (would be) a lot better if these foam inserts were/are replaced with overlapping rubber flaps instead. ;) Dell Rapid Rail Kit Installation: I would NOT recommend purchasing this Cabinet if you are planning to use Dell's Rapid Rails WITH the Wiring Harness Cage attached; I'm pretty sure IT WILL NOT FIT! The Rails BARELY fit without the Wiring Harness Cage (I used a Dell PowerEdge 2950 Rail Kit). If you are planning on using this cabinet with a set of Dell's Rapid Rails, there are a few things you must do first: 1. You MUST move the Front Rack Posts (and Cage Nuts) forward as far as possible. This will still only give you about 1/2-1" of clearance between the back end of the Rail and the Back Panel Door. 2. There are two round bolts, (which kind of look like a "T" from a side-view) on the Rack Post side of each rail, which protrude out far enough to prevent the rails from being installed without removing them. Remove them. :) The rails will install after the two "T" bolts have been removed from each rail, but not without a little bit of effort. The rails also have a Rubber Tab, on the Rack Post side, which will be pressed inward a bit during installation. There appears to be no damage, or reason for concern with the pressure on these rubber tabs, it's just an annoyance. :(
Overall Review: All in all, I would definately recommend this product, and will use it again. :)
8/15/2013See more detail
DOESN'T WORK WITH LION
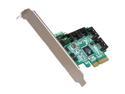
HighPoint RocketRAID 2640X4 SGL PCI-Express x4 SATA / SAS Controller Card
Pros: This card works great with Snow Leopard 10.6.x.
Cons: HighPoint removed all Mac OS X Lion support from their websites for this card. THERE IS NO SUPPORT for Lion 10.7. I contacted their lame company and they just said they don't support Lion, and aren't going to.
Overall Review: I am very skeptical of any of HighPoints products now. If they stop supporting their cards after 2-3 years, what good are they?
5/2/2012See more detail